Tutorial: How to Record Video from Video Devices
This tutorial describes how you can use Total Recorder VideoPro Edition to record from external devices. Instructions on recording from different external devices are similar but can differ in the ways different devices are configured. This tutorial describes how you can record video from a web camera. The sections below describe things to which you should pay attention when recording from a Digital Video (DV) camera and an analog TV tuner.
Recording the video output from your web camera
Take the following steps to record video output of your web-camera:
- Plug in your web camera.
- Start Total Recorder.
- Press the Recording Source and Parameters button
 . This will open the dialog
box shown:
. This will open the dialog
box shown:
-
If you plan to record only video data, select Video and proceed to step #11. If you plan to record both video and audio streams from your web camera,
select the Audio+Video radio button of the Record options.
- Configure the program used to record the audio stream by first selecting Soundboard mode. Then select the audio device from which sound will be recorded.
-
Most web cameras have built-in microphones. In this case, select the name of your web camera from the drop-down list of sound devices. If your web camera does not have a microphone, select the name of your soundcard instead. Select the
Use this line option and choose the
Microphone line. Note that the name of the line may vary depending on the type of your web camera. However, in most cases, there will be only one line in the list to select.
-
To select the sound recording format, in the
Recording format section, click the
Change button:
- In the File type (container) field, select the video recording format (AVI, WMV or FLV).
-
On the
Audio tab, select the audio format and attributes you want and press
OK. Refer to the
Selecting an Optimal Recording Format Tutorial for more information.
Since sound is recorded from a single microphone, you may consider using mono format for audio recording. If you plan to edit the recorded file, we suggest that you record sound without compression and perform compression after file has been edited.
-
Press OK to return to the Recording Source and Parameters window.
-
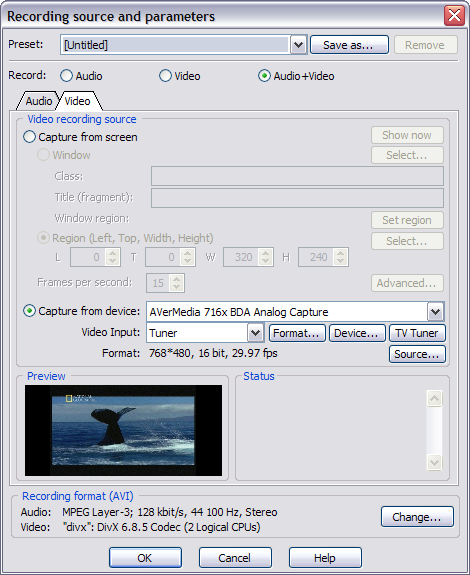
To configure parameters of video recording,
go to the
Video tab. This will open the dialog
for setting video recording parameters:
-
Select Capture from device option. Choose your web camera from the drop-down list. After that, Preview window will display the image from your web camera. If it does not, check that your web camera is correctly connected to the PC.
-
To set up format of video being recorded, press
Format button to open
Properties dialog (it may look differently for different types of web cameras):
-
In the
Properties dialog, select
Frame rate. Rate of 25-30 frames per second is recommended for high-performance computers. If your PC is not very powerful, you may wish to select lower frame rate, i.e. 15. Select
"RGB" as Color space/Compression. Select optimal
Output size. For higher quality recordings, select higher resolution. Fore more information about video parameters, see the
Primer on
Digital Video Recording.
-
Press OK to go back to the dialog
for setting video recording parameters.
-
If you wish to adjust the web camera settings, such as brightness, contrast, saturation etc, you can press the
Device button to open the dialog where these settings are available (it may look differently for different types of web cameras):
-
If you want to compress the video being recorded on the fly, you need to configure a compression codec and its parameters. To select the codec, in the
Recording format section, click the
Change button. Make sure that the correct file type is selected (for example, AVI). Go to the
Video tab. Select the
Convert video format to the one specified below check box. For compressing video being recorded from a web camera, you can use the free XVID codec.
If your processor cannot process the data (workload is 100%) during the recording and the recorded file contains missing frames (the image is "jerking"), then you will need to decrease the quality of the recording by selecting a smaller resolution and/or frame frequency. For more information on choosing these parameters, see
Primer on Digital Video Recording.
-
To select the appropriate mode for the XVID codec, click the Configure button to launch the
XVID configuration window. On this dialog you can change the
Quality settings if needed, as well as other codec settings. In the majority of cases, you can use the default codec settings by clicking the
Load defaults button. Note that configuration settings are different for each codec. For more information about a particular codec, refer to its documentation.
-
Press OK twice to go back to the dialog for setting video recording parameters.
-
If you wish to save this combination of settings for recording from web camera, you can press
Save As button in the upper part of the dialog and enter the name of the preset into the
Saving preset for recording parameters dialog:
-
Press OK two times to return to the main window of Total Recorder.
-
To monitor video as it is being recorded, select menu
Play/Record-> Preview (monitoring) mode:
-
Click the Record button.
-
When you want to stop recording, press Stop. From the File menu, select Save As, and specify the file name and the folder you want to use to store the file.
Recording from a Digital Video (DV) camera
To record from a DV camera's cassette, first connect the camera to the IEEE 1394 (FireWire) port of your computer, turn the camera on, and switch it to Playback mode. This allows data from the cassette to be recorded by the Total Recorder. There is no need to start playback on the camera.
The process of recording from a DV camera is the same as recording from any other video device. However, there are some things you need to be aware of.
Although you can record from a DV camera using the AVI, WMV or FLV container, it is recommended you use the AVI (Digital Video Type 1) container: on the Video tab of the Recording Source and Parameters dialog, select the Digital Video (DV) option in the File type (container) field. This option is specifically designed for such recordings. It allows you to record video from a DV camera without any changes and without any loss in image or sound quality. Using the DV container, the expected size of a recorded video is about 12 GB per hour.
On the Video tab of the Recording Source and Parameters dialog, select the device that corresponds to your DV camera. Then, if needed, navigate on the DV cassette to the place from which you want the recording to start. This can be done on the camera itself (refer to your camera's manual), or on the dialog for setting video parameters by clicking the Device… button to invoke a standard dialog box for controlling camera elements, as shown below:
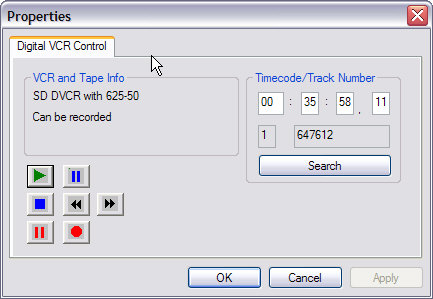
When navigating the cassette, you can view the footage both on the camera and in the Preview panel on the Video tab of the Recording Source and Parameters dialog. After you locate your starting point, click OK to return to Total Recorder's main window. When you click Record, the DV camera's cassette should automatically begin playback from the current point.
Note: Some DV camera models connected to a computer in Recording mode allow themselves to be used as a web camera.
Recording from an analog TV tuner
If your computer is equipped with an analog TV tuner then you can select it as a capturing device in Total Recorder. The TV Tuner button should then become available. If your device has several inputs, in the Video Input drop-down list, select Tuner as the input.
You can choose the image resolution by clicking the Format button. For information on selecting an appropriate resolution, see Primer on Digital Video Recording. Also review the Troubleshooting Tips when Working with Video section that deals with "Interlace" problems.
When you click the TV Tuner button, the following dialog box appears:
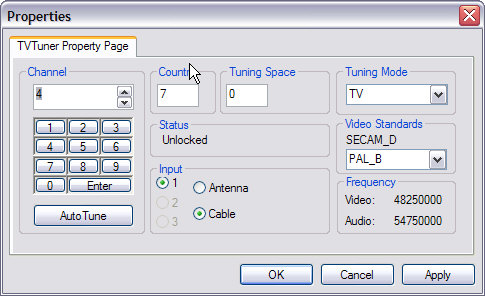
In the Input panel, specify the type of connection for your tuner. Usually, this is Antenna.
On the Channel panel, click the Auto Tune button to launch the automatic tuning procedure.
Choose the channel number in which you are interested.
You should see the image from the selected channel in the Preview panel of the dialog for setting video parameters, and hear the sound from this channel on your computer speakers.
If you do not hear sound, check that your tuner is connected correctly. Many TV tuners require their audio output to be physically connected to the sound card input with a special cable. In this case, the corresponding input should not be muted in the audio mixer.
Click OK to return to the dialog for setting video parameters and look at the image in the Preview panel.
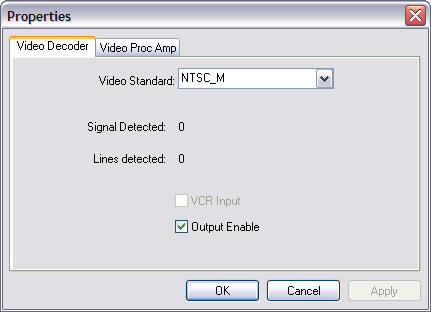
If either the color or sound of the image is distorted, the TV standard is probably not selected correctly. Click the Device… button and select an appropriate TV standard (NTSC, PAL, or SECAM).
If a cable connects your tuner's audio output to an audio input and you also want to record sound from the tuner, on Total Recorder's Recording Source and Parameters dialog box - Audio tab, select Soundboard mode - Use this line option, and from the list at the right, select the line to which the TV tuner is connected.