Tutorial: How to Schedule a Recording
This tutorial describes how to use Total Recorder's built-in scheduler to schedule a recording, the playback of local audio and video files, and download (capture) streaming audio and video. As you gain more experience with Total Recorder, you will find other great options in the scheduler to help you conveniently produce recordings of the desired quality.
The scheduler allows you to program Total Recorder so that it starts at a specific time, performs a required task (such as record or playback a file), and closes automatically.
This tutorial covers the following topics:
The scheduler's functionality
for recording differs
amongst the different editions of Total Recorder.
To become familiar with the scheduling feature, we suggest you schedule the playback of a file.
This procedure is very similar regardless of the edition (Standard, Professional, or VideoPro).
How to schedule a playback
To schedule the playback of a file, you need to indicate the time to start the playback, the location of the file, and the stop time.
- To open the scheduler, go to the Tools->
Scheduler menu , or press the
 button on the main toolbar. The Record/Play Schedule
dialog box appears. This dialog lets you monitor and manage the
list of all scheduled jobs:
button on the main toolbar. The Record/Play Schedule
dialog box appears. This dialog lets you monitor and manage the
list of all scheduled jobs: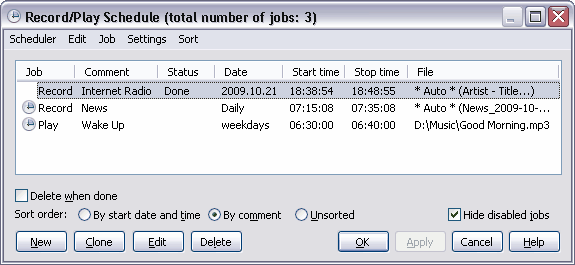
-
To create a new job, press the
New button. The
Schedule item dialog appears. This is where you specify all of the parameters for the scheduled job.
-
At the top of this dialog, there is a Comment field. The content of this field is shown in the Record/Play Schedule window and can be used for sorting scheduled jobs. For a test playback, we suggest that you use a comment of “Test” for this job.
-
Below the Comment field, there are three radio buttons, Play, Record and Background record, for selecting the type of scheduled job. For this test, select Play.
-
In the middle of this dialog, there is the Start/Stop time panel. This is where you indicate the date, the start time, and the stop time for your scheduled job. You can use the Now button to set the current date and time as the start time for the job. The time when the job should stop is set as the current time plus one second. After that, you can modify these parameters manually.
-
If you want to specify a stop time for playback, select the Stop at check box to the left, and enter your stop time. A file will be played continuously from the Start at time until the Stop at time, regardless of the length of the file. Without a stop time, the file will be played only once.
-
Now you need to indicate the location and name of
the file that you want to play. Use the
File name
field at the bottom of the dialog (the one with the yellow folder
sign to the right). You can either manually enter the name and
location of the file, or press the
Browse (

)
button to browse for the file.
-
Press OK to return to the Record/Play Schedule dialog. The job you have just scheduled now appears in the list along with its key characteristics, including its type, start time, stop time, etc.
-
Save your changes in the list of scheduled jobs by clicking OK or Apply. Note that if do not save the changes before the start time, your scheduled job will not launch.
Note that you do not need to leave Total Recorder open for it to start the scheduled job. The scheduler will open a new copy of Total Recorder at the scheduled start time.
How to schedule a recording using the Standard Edition
In the Standard Edition of Total Recorder, the scheduler will open Total Recorder at the scheduled start time and record the audio that is being played on your computer. This means that playback of the audio you want to record should begin prior to the start time of your scheduled recording.
To schedule the recording of a file, you need to indicate the times for starting and stopping the recording, recording source and parameters (such as format), the name of the file that will be recorded, and the location in which to save the recorded file when the scheduled job completes.
Take the following steps:
-
To open the scheduler, go to the
Tools->
Scheduler menu, or press the
button on the main toolbar. The
Record/Play Schedule
dialog appears. This dialog lets you monitor and manage the
list of all scheduled jobs:
-
To create a new job, press the
New button. The
Schedule item dialog appears. This is where you specify all of the parameters for the scheduled job :
-
At the top of this dialog, there is a Comment field. The content of this field is shown in the Record/Play Schedule window and can be used for sorting scheduled jobs. For a test recording, we suggest that you use a comment of “Test Recording”.
-
Below the Comment field, there are two radio buttons, Record and Play, for selecting the type of scheduled job. Select Record.
-
In the middle of this dialog, there is the Start/Stop time panel. This is where you indicate the date, start time, and stop time for your scheduled job. You can use the Now button to set the current date and time as the start time for the job. The time when the job should stop is set as the current time plus one second. After that, you can modify these parameters manually.
-
After setting the start and stop times, you need to indicate the recording source and parameters of your recording. For instructions on this, refer to the
Setting Recording Parameters Tutorial.
-
Now you need to indicate the location and
name of the file that will be saved once the scheduled recording
is complete. Use the
File name panel at the
bottom of the dialog. You can select either the
Auto
create option or the
This name option.
If you select
Auto create, a file will be given
an automatically generated name based on the current date and
time when the job completes. The file will be placed in Total
Recorder’s current directory. If you select
This
name, you can enter the file name and location either
manually or use the
(
)
button to browse for the file.
-
Press OK to return to the Record/Play Schedule dialog. The job you have just scheduled now appears in the list along with the key characteristics of the scheduled job, including its type, start time, stop time, etc.
- Save your changes in the list of scheduled jobs by clicking OK or Apply. Note that if do not save the changes before the start time, your scheduled job will not launch.
How to schedule a recording using the Professional or VideoPro Edition
With the Professional and VideoPro Editions, the scheduler
not only lets you start Total Recorder at the required time and
record audio being played back on your computer, it also allows
the playback program to be launched each time a scheduled recording
starts. Using the scheduler, you can also program Total Recorder
to connect to a pre-defined Internet web site and play the transmission
that you wish to record. The transmission starts and closes automatically.
It eliminates the requirement for you to leave your browser active
and connected to a web site when you have scheduled recordings of
Internet transmissions.
To record an Internet transmission, you should either obtain the full URL of the transmission, or tune Total Recorder's mini-browser on to this transmission.
To schedule the recording of a file in the Professional or VideoPro Edition of Total Recorder, you need to indicate the times to start and stop the recording, the recording source and parameters (such as the format), the name of the file that will be recorded, and the location in which to save the recorded file when the scheduled job completes. You can select many other parameters that will help you attain the desired results.
Take the following steps:
-
To open the scheduler, go to the
Tools->
Scheduler menu, or press the
button on the main toolbar. The
Record/Play Schedule
dialog appears. This dialog lets you monitor and manage
the list of all scheduled jobs:
-
Use the
New button to create a new job. This opens the
Schedule item dialog displaying the
General tab. This is where you define most of the parameters for a scheduled job :
-
At the top of this dialog, there is a Comment field. The content of this field is shown in the Record/Play Schedule window and can be used for sorting scheduled jobs. For a test recording, we suggest that you mark this job as “Test Recording”.
-
Below the Comment field, there are three radio buttons, Play, Record and Background record, for selecting the type of scheduled job. Select Record.
-
In the middle of this dialog, there is the Start/Stop time panel. This is where you indicate the date, start time, and stop time for your scheduled job. You can use the Now button to set the current date and time as the start time for the job. The time when the job should stop is set as the current time plus one second. After that, you can modify these parameters manually.
-
If you don’t know the exact time your recording should stop, you can press the
Advanced button to invoke the
Advanced stop recording conditions dialog. Using this dialog, you can specify a stop time that is based on file size, a period of silence or low level of sound recorded. You can also indicate that Total Recorder should shut down your computer when the scheduled job completes. For example, you can select the option
Stop recording if nothing recorded in nnn sec. if you do not want the recording of an Internet transmission to continue after the Internet transmission has finished, or your connection to the Internet has been lost.
-
After setting the start and stop times, you need to specify the recording source and parameters for your recording. For instructions on this, refer to the
Setting Recording Parameters Tutorial.
-
Now you need to indicate the location and name of
the file that will be saved once the scheduled recording is
complete. Use the
File name panel at the bottom
of the dialog. You can select either the
Automatically
create option or the
This name option.
If you select
Automatically create, a file
name will be generated according to a template that you can
create (see
File Name Generation
Tutorial). If you select
This name, you
can enter the file name and location either manually or use
the
Browse (
)
button to open a standard Windows dialog.
-
Check the
Split file according to the specified conditions check box if you want to break your file into separate fragments as it is being recorded. For more information on splitting files, refer to the
Splitting and Tagging Files Tutorial.
-
If you want to record an Internet transmission, you can have the scheduler connect to the Internet site and automatically start the transmission. Go to the
Advanced tab of the
Schedule item dialog:
-
If you know the URL address of the transmission that you want to record, select the Run option and enter the URL into the text field.
-
If you do not know the full URL of the transmission that you want to record, select
Connect to Website and Play Internet transmission and press the
Tune button to launch Total Recorder's mini-browser. Open the page from which you can start the transmission. Press the
Capture transmission button and click the link that starts the transmission. Answer
Yes to the prompt
Save URL "..." as a location to play . Press
Play to check that the transmission's URL is captured correctly. Press
OK to save the captured URL.

-
If you know that your Internet connection drops frequently, or that the Internet transmission is often interrupted because of some technical problems with the server, you can have Total Recorder detect this interruption and try to either re-establish the Internet connection or restart the transmission. Select the appropriate options on the
Repeat the actions above based on these conditions panel:
-
If you don’t want the sound being recorded to be audible during the recording (for example, you schedule a recording of a late-night broadcast), select Mute playback during scheduled job.
-
If you want to close all transmission-related windows at the end of a scheduled recording, you need to select the option After job completes, close all windows with following string in title, and either select the string from the drop-down list or enter it manually.
-
Press OK to return to the Record/Play Schedule dialog. The job you have just scheduled now appears in the list along with the key characteristics of the scheduled job, including its type, start time, stop time, etc.
-
Save your changes in the list of scheduled jobs by clicking OK or Apply. Note that if do not save the changes before the start time, your scheduled job will not launch.