Tutorial: How to Compress or Convert Video Using Total Recorder
VideoPro Edition
After you have captured and edited a video (for example, deleted all fragments that you don't need), it can still use a lot of hard-drive space if capturing was made without compression. To decrease the size of such a file, you can compress it using a more powerful video codec. The video-conversion procedure described below can also be used if you want to convert a video file to another format, for example, from WMV to AVI.
Let's consider the process of conversion to an AVI container, with simultaneous compression of a video, by using an example of the popular MPEG-4 codec, DivX version 6.8.5. Note that this codec would first need to be installed
on your PC. It can be downloaded from the official web site at //www.divx.com/.
Similar to choosing a codec for audio stream compression, you need to use the File -> Save As… menu to open a dialog for saving files, as shown below.
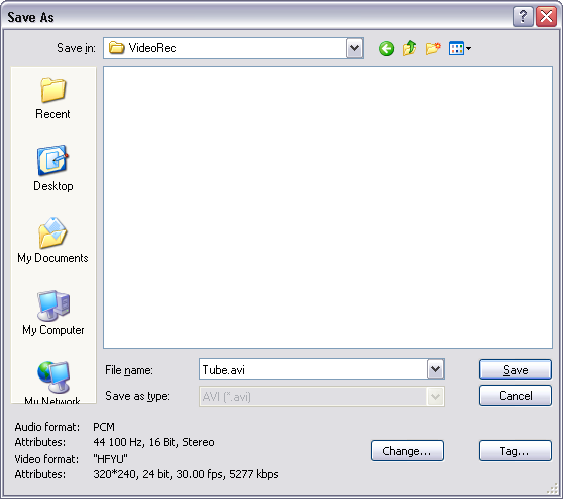
Click the Change: button to specify the video format. When selecting a video codec on the Media format: dialog, you can also set parameters for compressing an audio track on the Audio tab, if it has not been compressed using standard Total Recorder tools. When saving a file, both the video and audio tracks are compressed at the same time.
In the File type (container) field, select the AVI video format. On the Video tab, from the Codec drop-down list, select the DivX codec, as shown below:
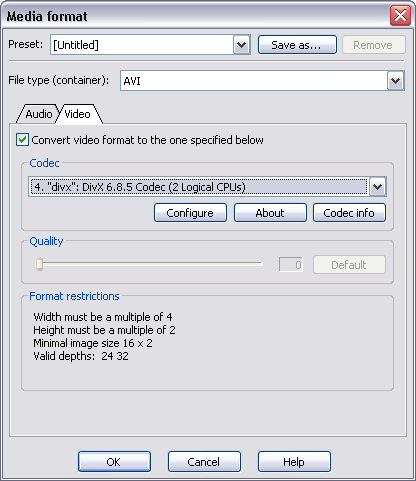
The most important thing is to properly set the codec's parameters. Click the Configure button to invoke a codec-specific dialog box:
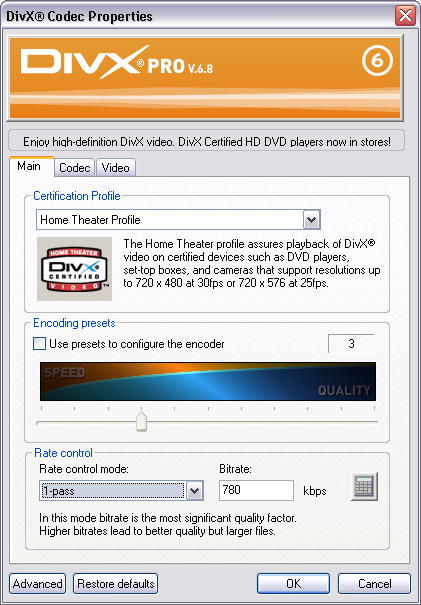
The majority of codecs have their own presets. To achieve results quickly, or if you do not have much experience in this area, you can select one of these presets. For the DivX codec, click the Restore defaults button to use the default settings. However, to maximize the video quality, you would need to manually configure the codec.
If the resolution of your video stream is greater than 640x480 pixels, for the Certification Profile, select High Definition Profile. For a resolution less than 640x480 pixels, the default setting of Home Theater Profile is sufficient.
The most important setting for any video codec is the "bit rate" or "quality". The higher the bit rate, the better the image quality. However, the size of the file will also increase. DivX lets you choose the quality setting mode: Bitrate Based - manually enter the required bit rate for video streams in Kbits per second; or Quality Based - enter a coefficient quality ranging from 1 to 31, and the codec will calculate the required bit rate itself.
If you want the resulting file to be of a certain size (e.g. to fit on a CD, DVD, or USB flash drive), then choose the Bitrate Based method. This allows you to control the size of the resulting file.
For example, a video file is 1 hour and 45 minutes long, and you want the video stream of this file to take 615 MB (CD-R size) on your hard drive. The whole file can actually appear to be a greater size since an audio track also has a "weight" that needs to be considered. Here is an example of calculating the required bit rate:
- 1 h 45 min = 105 min x 60 = 6 300 sec
- 615 MB = (615 x 1000 x 8) = 4 920 000 kbit
- bit rate = 4 920 000 / 6 300 = 780 kbit/s
Thus, you need to set the bit rate for video equal to 780 kBit/s. Note that these calculations are approximate and the resulting size of the video stream may differ.
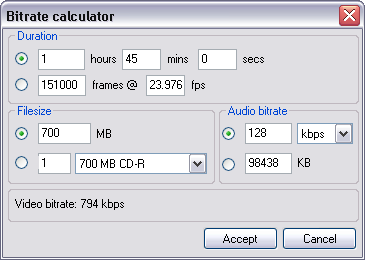
Some codecs, including DivX, have special bit-rate calculators to help you determine which bit rate is appropriate for different situations. These can provide more precise calculation of bit rates, and even take into account the size of an audio track.
If you want to obtain a standard quality file and there is no need to use any special processing, such as deinterlacing, click OK (in the codec settings dialog box), click OK (in the dialog box for choosing the video format), click Save (in the dialog box for saving files), and wait for the encoding process to complete. If a file is very large or your computer processor is not high-powered enough then the encoding process can take several hours.
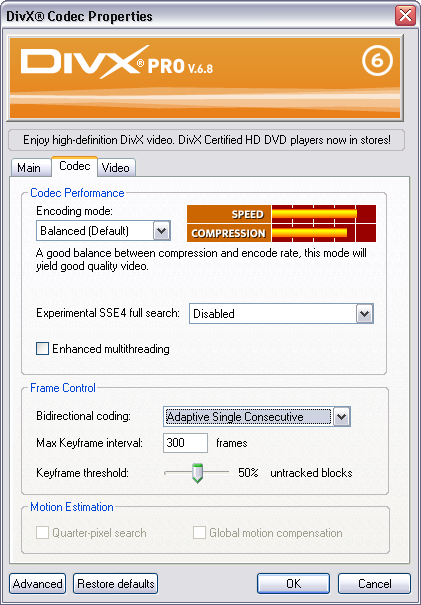
One important setting is the maximum interval between key frames. By decreasing this interval, you can often achieve better image quality, and allow for more precise navigation and editing within the resultant file. However, the size of the file can increase considerably. Similarly, increasing the interval between keyframes will decrease the file size but will also impair its quality. We recommend you leave this interval unchanged. However, if you decide to change it, you can do so on the Codec tab, in the Max Keyframe interval field, as shown below:
If you encounter a problem with interlaced video where distortions in the form of lengthwise stripes appear when playing back the video, you can get rid of them during the encoding process by turning on the deinterlace feature. For more information, see Troubleshooting Tips when Working with Video section. In the codec settings dialog, go to the Video tab:

From the Interlace drop-down list, select De-interlace source.
For the same bit rate, many video codecs can greatly improve the video quality by using two-pass encoding. By default, DivX applies only single-pass encoding. With two-pass encoding, the initial file is processed two times by the codec. During the first pass, the file is analyzed and the required information is recorded to an intermediate file. During the second pass, encoding of the final file is performed. As a result, you get a better quality video with the same bit rate, however encoding will take approximately twice as long. When using two-pass encoding, the actual bit rate is usually closer to the bit rate you specify.
In some cases, you can apply multi-pass encoding that provides even better quality video.
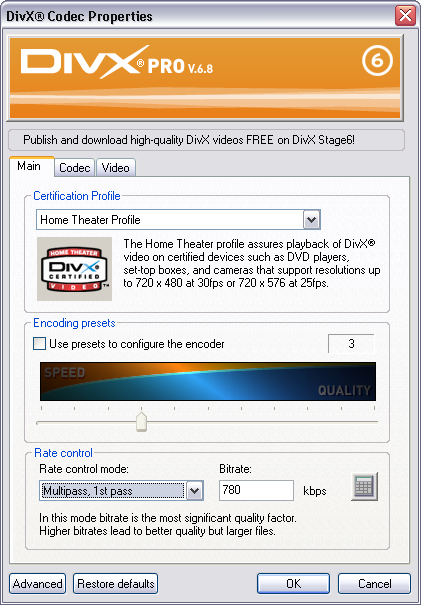
If you decide to use two-pass encoding, return to the Main tab, then from the Encode Mode drop-down list, select Multipass, 1st pass, as shown below.
If required, you can manually select a folder for intermediate files by clicking the Advanced button and specifying the Temporary Files Folder. Then click OK in the codec settings dialog box, and click OK in the Video format selection dialog box. Change the file name to include "1st pass" or something similar to indicate that it is the first pass at encoding the file. Press OK and wait for the first pass of encoding to complete.
Caution:
Do not overwrite your initial file as you will need it for the second pass.
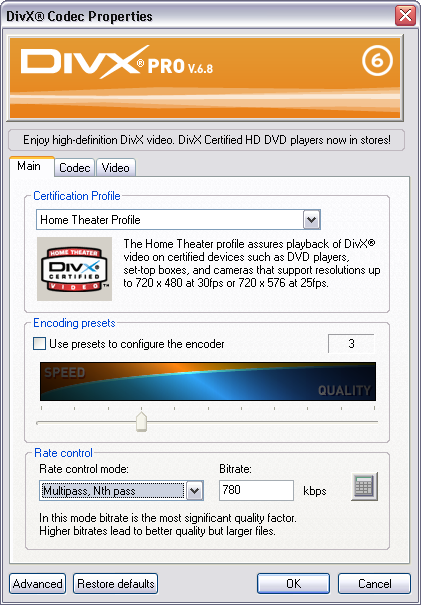
You should not reproduce the first pass encoding file. This may cause an error since an intermediate file and is not a proper video file. Instead, open the initial file and configure the same codec again, as described above. On the Main tab, from the Encode mode drop-down list, select Multipass, Nth pass, as shown below.
Click OK. Select the name of the destination file in the file-save dialog box. Settings for audio compression can be adjusted only during the second pass, since this is the final pass. Now, wait for the results of the final compression of the video file. Once the process completes, you can delete the intermediate video file created during the first pass as you do not need it any more.
The procedure of setting parameters for other codecs may differ from the one described here. We recommend you refer to your codec's manual, where you can also find information about many other useful settings and functions. For example, the full version of the DivX codec allows you to set options on the Video tab to apply noise reduction, resize the screen during compression, and encode only a part of an image.