Tutorial: How to Record Video from a Screen or Software Player
Perform screen video recording using Total Recorder VideoPro Edition. Capture flash player video from a browser.
This tutorial describes how to set up Total Recorder VideoPro Edition for screen video recording (i.e. capture video being played back in a screen area belonging to a software player or website).
To perform screen video recording, take the following steps:
- Start the video you want to record. This can be video from
another software player or website. You can pause the video
at the very beginning.
- Start Total Recorder.
- Click the Recording Source and Parameters
button to open the dialog box shown below:
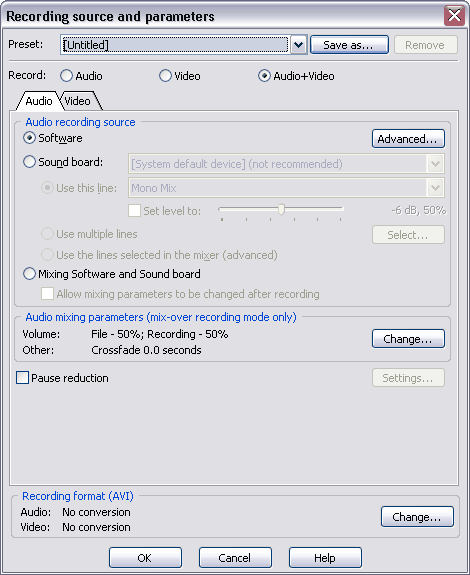
- If you plan to record only video data, in the Record
field, select Video and proceed to step 6.
If you plan to perform screen video recording with audio streams,
select Audio+Video.
- You will need to configure Total Recorder to record the audio
stream. Usually, Software mode is used to record
video from a screen, in which case, Total Recorder records sound
played back by other software, including Internet transmissions.
However, you can also select an external device for recording
sound in SoundBoard mode. For details on setting
audio recording parameters, see Setting
Recording Parameters. Note that not all audio and video
formats are compatible.
- To configure parameters for your screen video recording, go
to the Video tab:
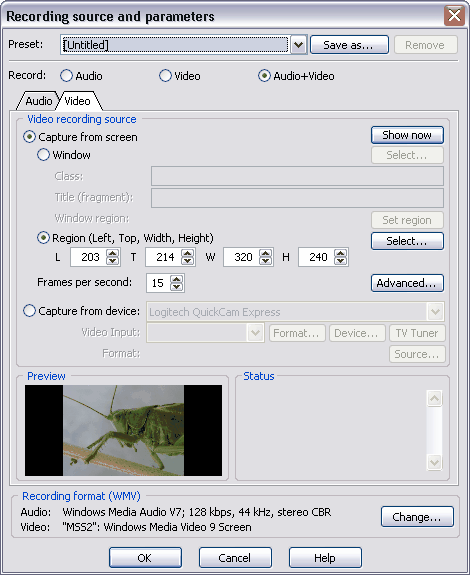
- Select the Capture from screen option, and
specify the capture area below. You can click the Show
now button to highlight the current selected area and
control the correctness of that area.
- If you want to capture the area of a certain window or its
child window, select the Window radio button.
You can use your mouse to select the window by clicking the
Select button. The Class,
Title, and optionally the Child
field are automatically filled in for you as you select the
window.
- If you want to manually set the coordinates of the area
to be captured, select the Region radio button
and fill in the Left, Top,
Width and Height fields.
You can use your mouse to select the region by clicking the
Select button.
- The Set region button switches the capture
mode from Window to Region. All of the current parameters,
such as the size and the location of the capture area, are
moved from the Window region to the Left, Top, Width, and
Height fields.
Note.
It is recommended you make the area being captured as small as
possible, as suggested below:
- Record a particular window or region
instead of the full screen.
- In the playback program, do not resize
video to a resolution that is larger than the original resolution
of the video. Such resizing can only result in a loss of quality
and an additional resource load. For example, if a playback
program plays an Internet stream with a video resolution of
320x240, do not resize the video area of this program to a
resolution that is larger than 320x240. The majority of video
playback programs allow you to select the video size relative
to the original size, such as "x1", "original size", etc.
- If you want to compress video being recorded on the fly, you
need to configure a compression codec and its parameters. To
select the codec, on the Recording format
panel, click the Change button. The Media
format dialog box appears. Make sure that the correct
container is selected in the File type field.
Go to the Video tab and select the Convert
video format to the one specified below check box.
For more information on selecting video formats and codecs,
refer to the Primer on Digital Video
Recording. For example, you can choose the Windows Media
Video 8 codec in the Codec panel as long as
you have selected the WMV file type.
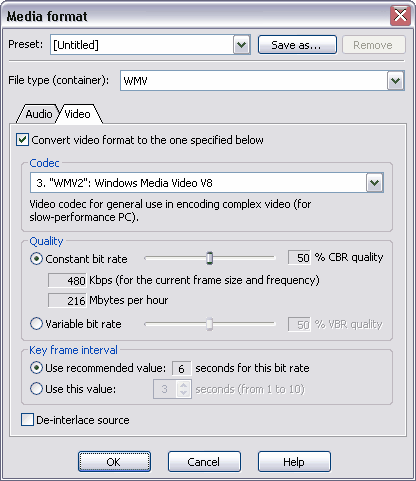
- On the Quality panel of the
Video format selection dialog box, you can
set the percentage of encoding quality based on the encoding
mode.
- Constant bit rate lets you control the
size of a file more accurately, with the approximate size
of the video stream being displayed in the Kbps
and Mbytes per hour fields.
- If you select Variable bit rate, the size
of the final video stream depends on the selected quality
and it is unknown beforehand.
- In the Key frame interval
panel, you can set the interval between key frames. For more
information on key frames, refer to How
to Edit Video Using Total Recorder VideoPro Edition. We
recommend you select the Use recommended value
option.
- When capturing video from a screen, the Deinterlace
source option should be cleared. If you record video
from a device, this option can be selected. For additional information
about "Interlace" problems, see Troubleshooting
Tips when Working with Video.
- If you wish to save this combination of settings
as a preset, click the Save as button in the
upper part of the dialog, and enter the name of the preset into
the Saving Preset dialog box:
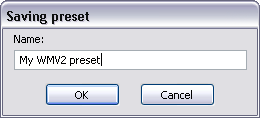
- Click OK two times to return
to the Recording Source and Parameter dialog,
Video tab.
- Enter the required frame frequency in the
Frames per second field. It is recommended
you use a frequency between 10 and 30 FPS. Values more than
30 FPS should not be used unless absolutely necessary.
- If you press the Advanced... button,
you will be able to optionally set the following parameters
for capturing video:
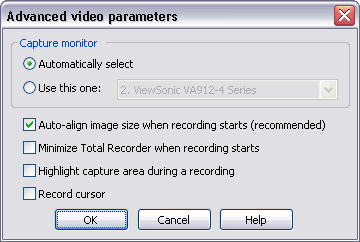
- Capture monitor identifies the monitor from which the video
(window or region) will be captured. Select the Automatically
select option if you want Total Recorder to capture
video from the same monitor as Total Recorder's main window.
The Use this one option lets you manually
select a particular monitor from the list.
- Auto align image size increases the size
of the captured area by several pixels when recording starts,
so that the width and height of the captured region are multiples
of 4 (not depending on the video codec). It is recommended
you leave this option selected.
- Minimize Total Recorder when recording starts
minimizes the Total Recorder VideoPro Edition windows when
a recording starts. This prevents the video from being accidentally
covered by Total Recorder's window.
- Highlight capture area during a recording
allows you to highlight the border of the screen area that
is currently being recorded.
- If you select the Record cursor option,
the VideoPro Edition records the cursor image if it is located
in the selected screen area. This option is useful if you
need to focus on parts of the video being recorded using your
mouse pointer.
- Click OK three times to return
to Total Recorder's main window.
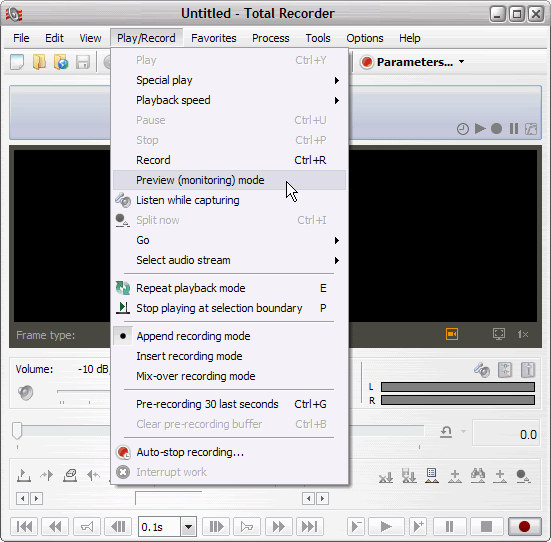
- To monitor video as it is being recorded,
from the Play/Record menu, select Monitoring
mode. The Video window should appear.
- Click the Record button.
- When you want to stop recording, click Stop.
- From the File menu, select
Save As, and specify the name of the file and
the folder in which you want to store the file.
Notes:
- After you select an area, pay attention to the Preview and Status panels in the dialog for setting video recording parameters. The Preview area shows the image that will be recorded. The Status field shows detailed information and can identify incorrect recording parameters. If you can see the image in the window/player, but nothing appears in the Preview area except for a black block, then it is likely you have encountered the "Black screen" problem. For more information about the "Black screen" problem, see the Troubleshooting Tips when Working with Video section.
- The advantage of capturing from Window is that if the selected window is moved or its size is changed before recording starts, the VideoPro Edition will automatically adjust to a new window position and the video will be recorded correctly. If you capture from Region, the VideoPro Edition always captures the screen area based on the coordinates you entered.
- If your Capture from screen setting is Window and the Class, Title and Child fields are empty, the VideoPro Edition captures the whole screen area.
- Since the Total Recorder captures a defined screen area with fixed coordinates during a recording session, the window playing the video to be recorded should not be closed, resized, moved, or covered with another window. Otherwise, you are unlikely to get the desired image.
|