Tutorial: Recording from an External Device
Most PC sound cards can record analog sound from an external device. Examples of such devices include cassette players, LP players, VCRs, portable music players, personal voice recorders, etc. Also, virtually all sound cards can record sound coming through a microphone.
The quality of such recordings can vary greatly depending on the sound card, the cable, and the external device itself.
In this tutorial, we will cover the following topics:
Signals and cables.
The first step is to connect an external device to a sound card with the appropriate cable. Most audio cables are inexpensive and can be bought in local consumer electronic or computer stores.
Different devices can produce sound of a different intensity or level. To accommodate these differences, a PC sound card usually has two different input jacks. One is usually labeled Microphone and the other is usually labeled Line in.
The Microphone jack is designed to receive low-level signals and is usually connected to an internal sound card amplifier (usually called a pre-amp) for the purpose of boosting the sound levels.
The Line-in jack is designed for so called line-level signals and does not use a pre-amp. You may need to read the manual for your device to find out the level of its sound output.
As a rule of thumb, you connect the device to the
Line-in jack in the following cases:
- an output is marked as line out, line, or line level
- an output is intended to be connected to amplified speakers
- an output is intended to be connected to non-amplified headphones
- a high-end microphone marked as line level.
You connect to the Microphone jack in the following cases:
- a standard microphone
- a direct needle output from an LP player
- an output is intended to be connected to amplified headphones
Many devices have more than one output. In such cases, it is always preferred to use line level output and connect it to Line-in.
For the vast majority of consumer-grade sound cards, both Microphone and Line-in are stereo 1/8’’ jacks. You need a 1/8’’ (stereo or mono) audio cable to plug into these jacks. A stereo cable has two rings (usually black) on its tip; a mono cable has just one.
Most external audio devices also have 1/8’’ stereo output jacks. In most cases, you need an audio cable with 1/8’’ tips on both ends. A microphone usually comes with a cable attached and this cable is usually mono.
In some cases, more complex cables (or adapters) are needed. For example, many home stereos have two mono outputs instead of one stereo. And many of them also have an RCA plug instead of 1/8’’. In this case, you need a Y-shaped adapter with a 1/8’’ stereo and two RCA monos. Another example is when you want to record from two microphones to get a stereo signal. You need a Y-shaped adapter with a 1/8’’ stereo and two (female) monos in which to plug microphones.
Recording settings.
To record from an external device, you need to configure Total Recorder to use Soundboard mode by taking the following steps:
- Start Total Recorder.
-
Press the
Recording Source and Parameters button

:
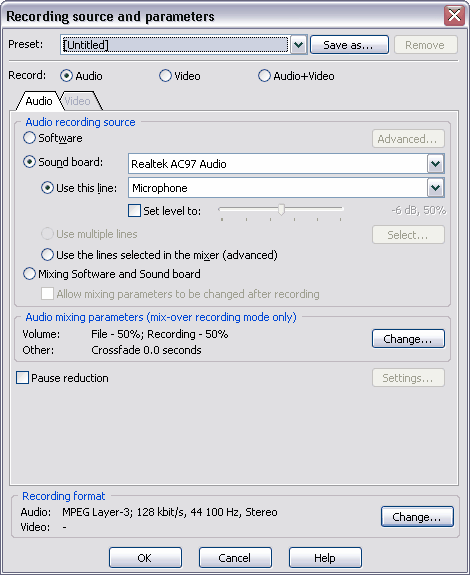
- Select Sound board. Choose the desired sound card from the list (do not choose Record through Total Recorder)
- Select Use this line. Choose Line-in or Microphone from the list depending on which jack the external device is connected to.
-
In the
Recording Format section, click the
Change button:
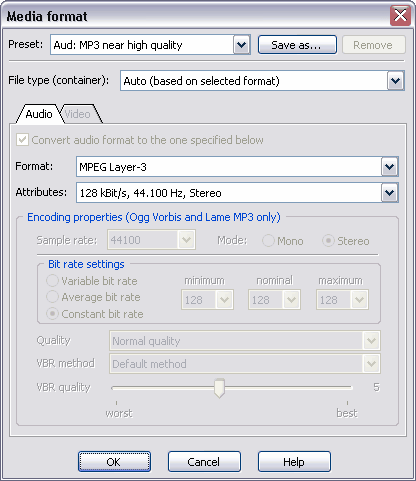
- Select the format and attributes you want and press OK. See the Selecting an Optimal Recording Format tutorial for more information. For example, for audio CD, select format PCM and attributes 44.1KHz 16 bit Stereo. Press OK to return to the main window.
- Start the external device and click the Record button in Total Recorder. After that, Total Recorder starts capturing sound. You should see see the levels changing.
- When you want to stop recording, press Stop. From the File menu, select Save As and specify the file name and the folder you want to use to store the file.